Hey friends! Here’s a list of promo codes/links for all of my faves! I update them all the time, so make sure to check back frequently! Let me know if you’re looking for anything particular! Happy Shopping!
At this point, I don’t remember what led us to redoing the powder room in the first place, but I feel like I remember there being a reason why…maybe a small toilet leak or something along those lines. It could also have very well been me itching to get my DIY on. We thought it would be a two day project, so we said [I said] “Hey, let’s give this baby a facelift!” Well, two days turned into close to a month but it was all worth while in the end! That’s what I’m suppose to say right? Truth is, I really wish it only took two days but it’s like having a baby; painful at the time but now I don’t even remember it being bad!
So where did we go wrong? We really didn’t, but as anyone knows or at least can suspect, whenever you’re renovating an older house, you’re bound to uncover a bunch of little treasures. Ours was the subfloor. We pulled up the linoleum flooring and ended up replacing the subfloor because the toilet had leaked in the past and the floor was damaged. If you’re going to do something like this, you have to do it right…so out with the old and in with the new. Once that was glued and screwed down, I decided to tackle my first ever tile job! I love puzzles and am super OCD, so this was fun for me, and surprisingly easy! We used the 12″x12″ mesh backed tile sheets. My husband, Rob, picked out the pattern actually! Design tip: typically in a smaller space, using the smaller tiles gives it the illusion of being bigger!
I then selected the perfect shade of slate blue, after sampling like 5 different colors, and went to work. We replaced the small vanity with a pedestal sink [that was a huge pain, because we needed it to be a certain width in order to fit with the toilet.] Home Depot to the rescue! We actually bought nearly everything from THD. We got the new door, door handle, toilet, sink, the paint, tile and all supplies there. I got my Moen faucet and matching fixtures on amazon because I was looking for a vintage style, chrome finish and sometimes you just can’t find that specific of an item in the store. [They’re all linked at the bottom]
This whole theme idea came from a West Elm light fixture that I purchased from someone on Facebook Marketplace…that ended up getting smashed by our contractor one day during the major part of the renovation. [Insert scream here] As mentioned in my instagram post, for those of you who caught it, the major reno also caused some nail pops in the powder room. We ended up with 2 quarter sized circles that needed to be spackled and then touched up with the blue. No biggie. Well, I came home from work one day and that same contractor messily spackled the whole wall! [slaps forehead] Fine, still not the biggest deal. I have enough leftover paint to do this one wall over…until I come home from work one day again…and the whole bathroom is repainted with the new color, polar bear. Essentially, white. Thank you Mario!
At this point, I don’t have enough paint to redo the whole thing and I’m not going back to THD for the 372,956th time just for this, so I switched gears and redid our newly redone powder room, leaving vintage inspired behind and going all in on the modern farmhouse!
I’m not mad about it anymore because, while it’s still a work in progress decor wise, I think it really came together nicely. Rob is the one who, I think jokingly, suggested wallpaper because he got super nervous when I started showing him options. I searched long and hard to find the perfect one and we love it! He’s totally on board. It’s Magnolia Peel and Stick “Pick Up Sticks” by Joanna Gaines, from…you guessed it, The Home Depot.
Before doing the wall paper, we actually decided to do the board and batten window panes along the bottom half of the walls. We mapped it out with tape, then Rob did it himself, using 4″ trim for the top and 3″ for the vertical. He glued and nail gunned them on. We redid the window and door trim too, when we replaced the door…that we had just replaced. But hey, everything has to match, right?
So, we get everything done and there’s one thing that’s driving me nuts…that natural gray color grout that we picked to match the blue walls and chrome features! After talking to my cousin about how she brought her grout lines back to life with this grout pen, I started to look into the concept further and found a whole world of grout paint pens! They’re just like the paint markers I use to use in the classroom, or like what you would write on a car window with…super easy. Shake, press, paint! They make chisel tips and thin tips, depending on the spacing you have, you should choose appropriately. Once you paint the grout lines, you wait a few minutes for it to dry and then go back in with a magic eraser or a Clorox wipe and scrub/wipe off the paint that got on the tile. So simple!
So, because grout doesn’t stick to grout, I would’ve had to scrape out all of the old [which I was not doing with a 3.5 year old, 1.5 year old and nursing a 2 month old.] This needed to be done, and fast! Grout pen it is! I decided I wanted black grout to pull out the black lines in the wallpaper. One quick amazon order and a few hours later, I had a newly done tile floor…for $11.
Comment with any questions you may have! I’m happy to help!
2020. A year of change, concern and uncertainty. For most of us, we didn’t know what to think about this “Coronavirus†and the two week hiatus we had to take from work, seemed like a welcomed holiday. I was teaching art to middle schoolers with exactly two weeks left to go before my due date with my third son. I was actually due on my birthday, May 2nd.
This was my second pregnancy with polyhydramnios, a condition where you have excessive fluid in the second half of the pregnancy, but this time it was slightly worse than the last. With my second son, I worked up until the day I delivered and I felt great, so I was planning on doing the same this time around but I definitely started to drag a bit at the end. This two week shut down couldn’t have come at a better time because it was going to run me right into my due date and I got a nice little break without having to use my days. Little did I know…
I had a scheduled induction, due to my condition, because the baby was breech for the last few weeks but he turned head down at the last minute. [The extra fluid allows them to move freely up until the end.] So, April 29th at 6am, they brought me in, much like the last time and prepared to induce. The only difference this time, was they didn’t do an ultrasound to confirm the baby’s position before starting the induction and before we knew it, just like that, I went from 1-4cm in about an hour or so. So, here I am, kicking back, feeling no pain, eating my snacks and smelling my essential oil sticks that the nice nurse in training gave me, when she and the head nurse both checked me to see my progress. They quickly left the room, only to return minutes later with the doctor and an ultrasound machine. Turns out, the head nurse didn’t think she felt the head…and she was right. The baby had turned sometime between the last appointment I had and me being induced. It could’ve happened while I had the epidural and I didn’t feel it, or it could’ve happened the day before. We’ll never know.
Having two, very active, little boys at home already [ages 1.5 and 3.5] and having had both vaginally, I really did not want to have a c-section with this one. I knew the recovery would be tough with them being so young and needy…and they’re not tiny children, so picking up a 30 lb one year old wouldn’t fly and you can’t not pick up a baby that young for weeks…just getting him in and out of the crib alone would be an issue and at some point my husband had to go back to work, or so we thought.
So, when the doctor’s first reaction to the ultrasound was to perform a c-section, I started to cry and asked if a version was an option. I had one with my last pregnancy, successfully. It’s typically performed by a high risk doctor who manually turns the baby, from the outside. It’s not at all pleasant, but worth the pain to avoid a cesarean. She agreed to call the high risk doctor up and get her input, to which that doctor said, “For the same reason your baby turned this late, makes you a good candidate for this to be successful.†This particular doctor performed my last version too, where I had no help with medication, at all. So, this time, with an epidural in me, I knew this would be cake! WRONG.
They attempted to roll the baby in a backwards motion, which is the lesser preferred direction, but it was also the shortest path to my cervix. The baby’s heart rate dipped, but turning on my side, taking in some oxygen for a few and my OB manually elevating him off of the umbilical cord got him right back to normal. They all left the room and I hung out for about 20 minutes to make sure he was 100% before they came back and tried it again. [My OB actually delivered another baby during this break from me!] This next attempt, they took the longer route, but rolled the baby in a forward roll, the preferred way.
Now, having this done before, I have my theories as to why things went south shortly after this next attempt. Hand positioning is everything with this procedure and you have to be delicate and precise. There’s a lot going on in there that you have to watch out for; you know, like organs, the baby, etc. It also helps to have knowledgeable professionals performing it. In my opinion, there should be a “team†of doctors, who roll at least two people deep, to perform these, since one has to “push†while the other “pullsâ€. Well, same as the first time, it was just the one doctor and whoever was willing to jump in, did! My OB made it very clear that she had never done this and asked for some tips. Similarly, the nurse that helped with my last pregnancy said the same and everything was great, so I wasn’t too alarmed. After all, she was an OBGYN with many years of experience. She had this, right? Again, WRONG.
She came at me with a CPR technique [opposite of how they should be] and pressed down right under my breastbone. I almost jumped off the table, numb legs and all. Remember, I had an epidural. Something hurt so bad, I thought she popped my diaphragm. I stayed strong, biting my tongue and they got the baby’s head to about 5 o’clock. While the high risk doctor gave him the extra push to 6 o’clock [right where he needed to be], my OB broke my water because she didn’t want to chance him turning right back around. I was so relieved, I was crying again. We did it. The baby tolerated it and now I just had to wait to dilate a few more centimeters and it was game on! So, with breaking my water, all this fluid has to go somewhere right? Well, it shot across the room like a dam opened up. I remember my OB making a joke about getting her pants dirty again and then shit got real.
The high risk doctor, who was monitoring the baby the entire time, noticed his heart rate dropping. No big deal, turn back on your side, oxygen on, give it a second. Nope. Other side. Nope. Better on the first side. The doc yells, “Turn! Turn back!†[All the while hand up there elevating the baby] Yells to prep the OR for a c-section. “Get on your hands and knees!†I position myself, still completely numb from the epidural, to lift myself up and flip over and as I raise myself up on an incline, the heart rate comes back up. “Hold it right there!†Ugh, thank god, I think to myself. I relaxed and took a breath. She yells to put a hold on the OR. Everyone starts laughing in disbelief. Little Bugger…It had been 7 minutes.
The elevated heart rate lasted for about a minute before it dipped again, which ended up being what helped save my son’s life. “Hands and knees!†she yells “Go! Drop to your elbows!†[At this point she’s up inside me again, elbow deep, trying to manually elevate the baby off of the umbilical cord, which is what I believe she thought was causing the problem. “Get on your head!†My husband is behind me watching this, shocked and awed, hand closed into a fist covering his mouth in disbelief. I’m feeling like something from National Geographic; an elephant pregnancy check or something. My husband, nurse in training, head nurse, OB and high risk doctor were all in the room. Somehow, there’s always a crowd when I’m going through something personal and “intimate.†Resident? Medical student who’s trying out Obstetrics? Random guy off the street? Bring it on, the more the merrier! Honestly, at this point I couldn’t have cared less who was there.
I heard her say I was hemorrhaging and then yell for the OR again. She flips me over on my back, throws a shower cap at me and tells me to cover my hair and just like that, I was the lead patient in a Grey’s Anatomy episode. Flat on my back, the overhead fluorescent lights whizzing past me repetitiously. I got the slightest glimpse of my husband in a yellow gown, frantically trying to put on booties, before I was rushed out of the room and into the OR. They transferred me to the operating table, strapped my arms down, sloppily draped that normally taught blue sheet in front of me. I remember it being uncomfortably close to my face because they didn’t have time to make it perfect. The anesthesiologist asked the doctor if he was putting me under. I heard, “There’s no time, just burst her with whatever you’ve got!†[Thank God for already having had that epidural] The doc says to me, frantically yet firmly, “Kelli, if you feel ANYTHING you HAVE to let me know!†…and then she cut me open.
I felt every bit of it, not pain, but that things were happening. It was wild. I thought my husband was holding my hand, but turned my head to see it was a nurse. At that, I hear someone ask if anyone got Dad and the nurse ran out to grab Rob. They told him to stay where he was and someone would come get him…and then they forgot! In the meantime, I heard my doctor’s voice say “Baby’s out, he’s gray, he’s got to go!†and then he was gone. Rob comes rushing in, leaning down to be near my head, crushing my heart rate monitor and setting it off. He missed the whole thing. They were in such a hurry to close me up, they didn’t do a sponge count, but instead x-rayed me after. I was in there for 45 minutes but it felt like 4. From the time my OB made the final call for the c-section, to the time the baby was ripped out of me, it had been 7 minutes.
I don’t remember much else, only being in the recovery room all of a sudden, sitting up. The nurse in training was a doll and never left my side. Rob was gone, with the baby, I think. He had been taken to the NICU. I looked at the clock to see the time; it was 2:30pm. It occurred to me I didn’t know what time my son had been born, so I asked. 12:21pm. TWO HOURS AGO?! I had absolutely no concept of time up to this point. I couldn’t believe they hadn’t brought me to see my baby yet! The nurse left and came back with a photo of my son, laying on his back, intubated, on a bag of ice. An arterial line already in his belly button to try and get as much blood from his cord back in him as they could. This was the first time I saw my son, two hours after having him, in a photo, like that…WTF happened?! I realized then, they had been stalling for time. They kept telling me I had to have feeling back in my legs before they would bring me in, but in the end, I was wheeled in on my recovery bed anyway. After all, I had just been violently gutted like a fish! I wasn’t walking anywhere!
My husband and I never got to hold him or really see him. He was facing away from us and already hooked up to IV’s and monitors by the time we got there. The head NICU doctor was on the phone calling for an ambulance to transport him to a nearby hospital with a NICU more capable of tending to him. We heard him yell “I don’t have 2 hours! Get it here now!†Umm, what?! WHY don’t you have two hours?!WHAT is going on?! Turns out there’s only two ambulances equipped to transfer infants and they were both out on other transfers up north. The closest one rushed back, the specialized team burst in, pointedly told my husband there was no time to explain all the paperwork, he vigorously signed it all, and off they went.
By now, I’m in my mommy/baby recovery room, [sans baby] anxiously waiting for them to bring him by so I could say goodbye [not yet knowing the severity of the situation]. Waiting, waiting…my husband comes in, alone. “They’re not bringing him by. They’re already gone.†I couldn’t believe it. I was already in the room when the ambulance arrived, so I missed the whole “pressed for time†conversation. I was so angry. I knew going into this practice that the NICU was only level 2, and that the level 3 was right around the corner in case we needed to be transferred. I just never thought I’d need it and I definitely never thought that, if we did, I wouldn’t be transferred with the baby! My husband gathered his things and left to be with the baby, leaving me indefinitely. With COVID, once you left, you couldn’t come back.
I got a call a few hours later from a Pediatric NICU doctor at the hospital the baby was sent to. She explained to me that the baby lost a ton of blood and oxygen, was critical and could potentially have brain damage. Come again? I held it together while she went on to explain that he would be undergoing a process where they would hook him up to a morphine drip and keep him on a cooling bed that brought his temperature down and held it there, to ultimately shut his brain and body down. This helped stop any brain damage in its tracks and prevent it from further damaging more tissue. He also had a build up of lactic acid, from the loss of oxygen [aka hypoxia] and so they had to give that time to leave his brain as well. He would stay cooled for 3 days before they switched the machine over and incrementally rewarm him back to normal body temperature. [Half a degree every 3 hours] He would need blood transfusions, plasma transfusions, platelet transfusions, IVs of antibiotics, nutrition [because he was obviously not eating]. He was on a ventilator and couldn’t be touched or spoken to. NO STIMULATION. He would be hooked up to an EEG, EKG and have CT Scans to monitor him for any seizure like activity [common with this cooling process], and check his lungs and heart. “Any questions?†She asks. Uh, ya think?!
So here I am, alone in this “mommy/baby†room, again, no baby…PUMPING to get my milk to come in and build/maintain a supply. I just had major abdominal surgery so I can’t get up AND I don’t have my husband, or anyone to help me! I felt like I had my appendix out. It was so awful. The nurses were ok, but I had to call them to come set up my pump for me, pump for 20 min and then call them back to pack up my colostrum and clean my pump for the next time. One time the nurse said she’d come, then never did and my precious production went to waste. All night I was poked and prodded. They had to check my platelet count by taking blood, at 4am, to see if I needed any blood [I did not]. It was just awful. I couldn’t wait to get out of there. In the meantime, I got the all clear to eat anything I wanted, so I ordered all of it and tried to eat my feelings through grilled cheeses and milkshakes and anything else fried that I could get my hands on…and then I violently threw all of it up. Twice. That was fun with the newly stitched up wound across my stomach. Lesson learned.
The next morning, as I’m scratching off whatever skin was leftover from the night before, because I was reacting to the drugs they had me on, another doctor from my practice came to see me and explained her theory; that when they broke my water, the large amount of fluid created such a forceful gush, that it ripped my placenta right off the uterine wall; a placenta abruption. [A known side effect of having polyhydramnios] and that’s what caused the bleeding and oxygen loss.
She laughed as she scolded me for eating so much, told me the delivering OB was upset and shaken up, said I could leave after I peed and hit 24 hours from delivery and went about her day. The nurses tried to encourage me to stay for 4 days after what had happened, but I hit my limit when I went to get something out of my bag and saw the baby’s homecoming outfit in there. I didn’t even shower. I got up, peed and literally walked myself to the car, where my husband was waiting like it was a curbside pickup for takeout, because he wasn’t even allowed in to help me out.
The first thing we did was go home so I could kiss and hug my little guys [who did not understand why Baby Ben wasn’t with me], and so I could shower and go up to see Ben in the NICU. Well, the shower curtain and rod fell down on me and I seriously underestimated how swollen I would be after this delivery. I looked like Tim Allen from The Santa Claus, in my new, “chicâ€, matching sweat suit I bought from Lou and Grey to wear home. It was a great start to day 2. As I cried, tearing through my wardrobe, desperate to find anything that fit, I relied on the underlying humor of the day’s events so far to lighten the mood and had a quick but much needed chuckle with my husband, before reality set in.
You think NICU baby and you think preemie. At least we did. You think NICU baby and you think parents [plural] who don’t leave the baby’s side, day and night, a special room designated for them. Not now. Again, because of COVID, visiting hours were limited, only one of us was allowed IN THE HOSPITAL at a time and once we left, we couldn’t go back until the next day. Naturally, after having the surgery I did, I couldn’t drive myself. I wasn’t allowed. And I wasn’t going to make my husband wait in the car for 12 hours while I visited. After all, he wanted to see the baby too, we had the other two at home waiting for us and we were no longer right around the corner from our charming little hospital. Now, going to see him was a daily event that we had to block out a few hours for. So, for the next two weeks, we took turns going up to the NICU for an hour or so a day, we took turns seeing our son for the first time; laying on a cold bed, motionless, exposed and alone, hooked up to a million different tubes, monitors, IVs, machines etc, without each other to lean on, hug or fall into crying. We took turns hearing good news and bad. We took turns holding our baby for the first time, nearly two weeks after he was born, without each other there to document it. I started scheduling my visits to be at a time I was due to pump, and would do so at his bedside. I nursed my baby for the first time, almost two weeks after he was born…alone. And the day I heard the best news of my life, the moment we were waiting for, holding our breath…that his MRI came back normal and there was no evidence of brain damage…I was alone.
In the spirit of keeping the theme, I spent my time there, cried and hugged my baby, still hooked up to oxygen and whatever else was left, handed him back to his nurse and calmly walked down to the car where Rob awaited his turn. I said nothing. I let him go up and get the news himself, first hand, from the wonderful nurse who took such good care of our little warrior from day one. I just felt, if we couldn’t experience that anticipated moment together, he should at least get to experience it how I did. To feel his legs get weightless under him and have to ask her to repeat herself for fear of mishearing the information. Don’t get me wrong, we would have loved this baby no matter what the outcome and we were more than prepared to do so. It was just different knowing that he didn’t have any issues in the womb and that I kept him safe and healthy until the bitter end, only for this to go down how it did. His nurse told me that she belonged to my practice and would have delivered at the quiet, quaint little hospital I had…until she walked into the first day of her job as a NICU nurse and saw all of the full term babies, because she too, associated the NICU with preemies. She switched shortly thereafter to a practice that delivered at the hospital with the level 3 NICU.
Now, over the course of Ben’s two weeks there, he successfully completed the cooling and rewarming process, it took a minute for his body [organs, processes etc] to kick back into gear afterwards and start to work again, but it did and he learned how to suck on a pacifier while getting my breast milk through a feeding tube, so he could associate the feeling of being full with sucking. Eventually, he learned how to suck, swallow and breathe as they introduced a bottle and after he did that successfully for a few feedings, they allowed me to nurse him! It was around this time that every day we went in, something was removed from him until he was left with just the oxygen or CPAP. Everyday got better and better. He had some setbacks along the way, which were super aggravating, yet “expected†for this process…I still didn’t want to hear it. All I wanted to do was get him home. The final straw that nearly broke the camel’s back was being told, for the second time, that we could take him home and then his potential apnea kept him there for another two days. We were told we’d have to bring him home on a monitor 24/7 for four weeks. He ended up passing the test and they deemed it safe for him to be discharged without the monitor. HALLELUJAH! So after a birthday and mother’s day came and went without all my children under one roof, we finally got to take Ben home to meet his brothers on May 12, 2020.
What a whirlwind! I felt horrible guilt for pushing so hard to avoid the c-section. The irony in the whole situation is that, had I gone ahead with a scheduled one, cool calm and collected, this would have never happened! Although the whole basis of this post is about the unexpected, right? Still, it took a long time for me to make right with myself about it. All I kept thinking was I put this beautiful little miracle baby at risk, for the sake of my other two, because all I worried about was not being the best mother I could to them, if I was incapacitated for weeks. And in the end, I wound up with a c-section recovery, worse than normal, anyway. That’s what I get for trying to control everything.
Fast forward to just about 3 months after this horrific day and our big guy is happy, healthy and seemingly hitting all of his milestones. He wakes up every day with a smile on his face and gets mad as hell when the other two don’t let him nap. It takes a lot to check ourselves on a daily basis when the 3.5 year old is trying our patience or the toddler is somehow climbing on the counter when I’m trying to nurse the baby. We have to stop and say, we asked for all of this, we’re lucky we have this and it’s going to go by so fast, we need to soak it all in now. We find ourselves, every so often, watching Ben as he grows, smiling and laughing at his big obnoxious brothers, saying, “Remember he almost died?!†Now, those 15 days that seemed like they had no end in sight, seem like a lifetime ago and it feels like we’ve had him forever. Sometimes we forget that we missed the first two weeks of his life when a monthly anniversary comes up so quickly. After two mostly normal and routine deliveries, we went into this one thinking it would be a cake walk and it was anything but. It tested our marriage, it tested our boys and their level of awareness, our 3 year old all but would climb on the roof and jump off to get our attention if we started talking about the baby or the doctors…and it certainly tested our strength.
I am thankful for the doctor kicking it into high gear when the pressure got real and saving his life by getting him out so quickly. We were told 10 minutes without blood and oxygen is when they really “go down the tubes”. We had 3 left to spare. I am thankful for the head NICU doctor who got that extra cord blood back into our son and knew to start the cooling process using ice, while we waited for the ambulance. I am thankful for the team who rushed back to transfer our son and got him to the new NICU and on that cooling bed at hour 5, when we only had 6 before it was too late. I am thankful for science and the crazy process that helped our baby recover. I learned that the human body is an amazing thing but no matter how much modern medicine we have, we truly have zero control over it. Most importantly, I learned just how strong I am, even when I felt I was at my weakest. I am now and forever will be a part of the NICU mom’s club and while everyone’s story is different, they are all our own. It changes you. Some for the better, some for worse. Some have happy endings, like mine and some do not and that breaks my heart. Nobody should have to go through what so many moms [and dads] have to go through, during a time when it should be the happiest of their lives. They say what doesn’t kill you makes you stronger and I truly believe that, regardless of how it may present itself in the end.
But, I’m real. I have my good and bad moments as a mom of 3 under 4. I get stressed. I get frustrated. I get sad about how stressed and frustrated I get. I wonder if I’m doing a good enough job. Then, I think of my friend who just delivered her perfect baby girl, alone in a dark hallway, unexpectedly, and I remember how truly strong a woman is. We are warriors. Our bodies go through so much with everything working out perfectly, let alone all these crazy stories you hear. I told my friend, she trumped me, with what she just went through and she responded by saying, “Nah, I just joined your club.â€
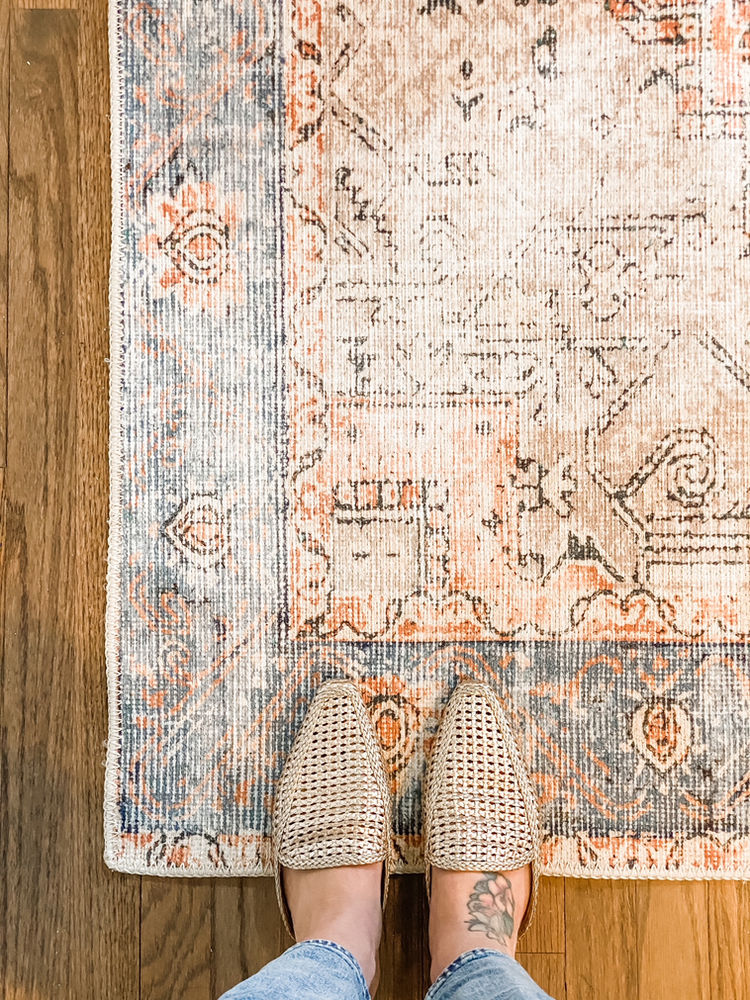
Choosing the perfect rug can be a somewhat tedious process, especially when you’re spending good money on them. It literally took me months of searching to decide on what to get for my modern farmhouse dining room and stairwell. I was scrolling through Pinterest one day, when I came across this stair runner that I loved and the link happened to take me to Annie Selke. Upon researching this company, I found that they have beautiful and high quality products and people love them! So, I decided to look here for what I needed. If you follow me, you know I love anything with a higher purpose, sustainability etc…and these rugs are exactly that. Hand made in India, these rugs are crafted by artisans committed to fair-labor practices.
The Selection Process…
You have to think about all of your factors; environment, location, usage etc…Viscose is not suitable if you have pets or children. It wears quickly and can lose its luster. Some natural rugs aren’t good in direct sunlight, as they can fade, other materials don’t handle stains well and so on.
Annie Selke is great because they take the guessing out of selecting a rug for you! Every product page offers a detailed blurb on material, how to clean and where to use! This was tremendously helpful for me because I made my decision, confident I wasn’t wasting my time! Love this one! Nope, not good for stairs. Have to have this! Wait, it won’t do well in a dining room…but then, it all fell into place.
My Selections…
The Stairs
First up is this gorgeous stair runner! Yep, I did it myself too! I explain how and include the step by step process with photos in this tutorial. I didn’t know this when I picked it out, but this runner is their best-selling herringbone woven cotton rug and it’s back with a beautiful update. In a timeless black hue, this classic menswear inspired pattern is the perfect way to add a touch of understated pattern to bedrooms, hallways, stairs, and more. [That’s another feature I love; almost all of their products can be full sized rugs or runner! So, if I wanted, I could’ve also had this as a 10×14 in my dining room!]
FEATURES & BENEFITS: Durable construction; soft underfoot; lightweight.
WHERE TO USE: High and low-traffic spaces; well-used family areas like hallways, bedrooms, and stairs.
100% Cotton
If you have hard wood floors and an older home, like we do, you understand the squeaky floor problem is REAL. I even went so far as to buy an at home kit but we never used it because we didn’t want to make marks on the floor, where you screw in the reinforcements. Every time someone walked up or down the stairs, it would wake up the entire house! I’m so glad we didn’t use the screws, because this runner minimized the squeaks so much and without damaging the treads! Now, I don’t even hear my kids and I can hardly hear my husband! It’s also made it much more comfortable on our feet and obviously aids in preventing slips and falls. I feel better about the dogs’ hips too! That always made me so nervous!
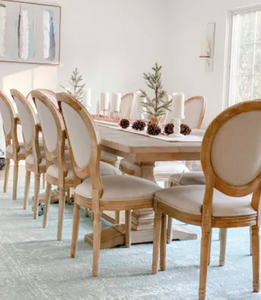
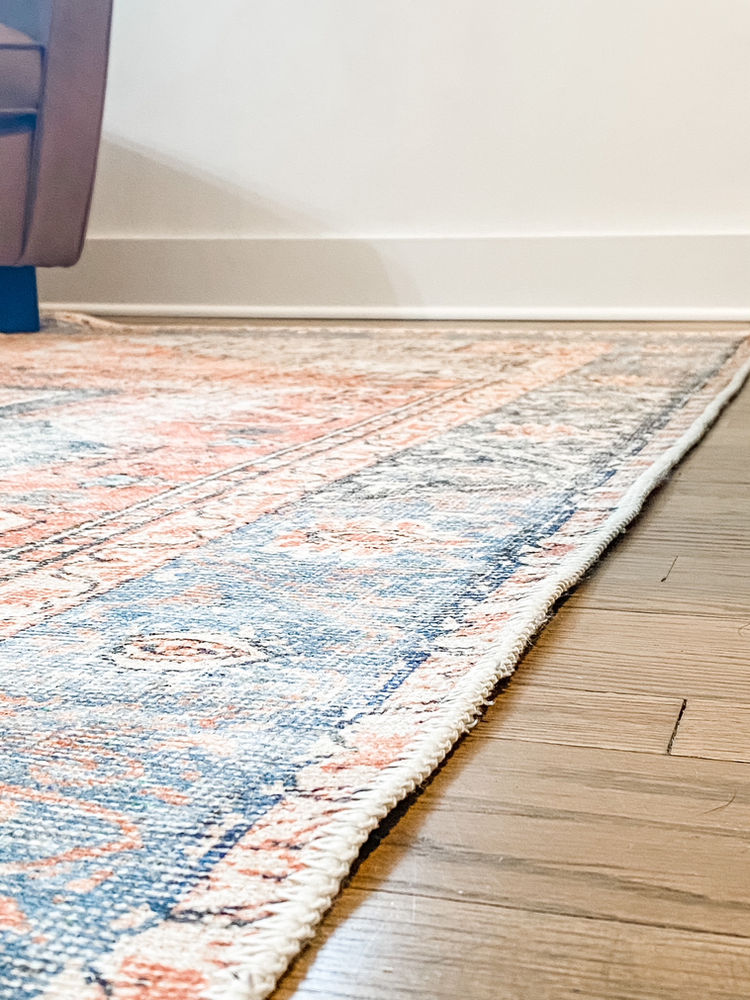
Next is my dining room and oh em gee…is this rug not everything?! I unknowingly chose another best seller, the Kali Woven Jute Rug; a large ivory latticework pattern that emerges from the relaxed natural jute kilim weave foundation with a punctuating charcoal dot at the interstices. This simple flatwoven jute design offers beauty and appeal on a scale that makes it modern and timeless. Eco-friendly, ultra durable and great for any indoor room.
WHERE TO USE: Great in high-traffic indoor areas and on covered porches. Placement of these rugs is important, as our Jute rugs are dyed with vegetable based dyes that can fade if exposed to frequent sunlight.
80% Jute/15% Cotton/5% Polyester
Size Selection…
When thinking about the size of your rug, you should make sure that when people are sitting, their chairs remain on the rug.We have a table that we keep the leaves in, making it 8 feet long. We have 4 chairs on the sides and 1 at each end, so we went with a 10×14 rug. Our room is 13×20, so it fills the space beautifully and adds warmth, softness and contrast to the white brick fireplace and hardwood floors.
Our stairs come down into the dining room, so visually, the runner and dining room rug had to tie into one another. I didn’t want them to be too matchy, matchy but they needed to compliment one another. I also had the difficult design task of not clashing with our floors or table tones, but making sure that the rug stood out from the floor and didn’t blend in. Our floor stains were such a process and I’ll discuss that in another post soon, but in short, they have a mixture of classic gray in them. This makes that charcoal punctuation flow seamlessly with the wood tones and tie in nicely with the black and ivory runner.
I can’t wait for the rest of our dining room furniture to arrive, so I can complete that space and showcase it to you! The pieces are going to go perfectly with this Kali rug. When my husband says, out of the blue, that he loves the rug, you know you picked a good one!
It’s no secret I have a love affair with Amazon and if you’re unfamiliar, they have fabulous clothing options. It’s definitely hit or miss and I send a lot back…but recently I have hit the jackpot. I’m sharing the most recent additions to my Fall/Winter wardrobe below and most are from my now trusted brands that I love; Anrabess, Kirundo and Angashion. I have others I’ll share, but in another post.
I am giving my stamp of approval on every sweater shown here. They are truly the softest, and I mean soft, flattering, forgiving, comfortable, stylish…the list goes on. I’ve already worn several and it’s still been 75 degrees here during the day, so they’re also great as transitional pieces to take you far into the winter season! Definitely a great investment for the affordable price!
I’m all about exaggerated sleeve and neck detail these days…Love a good balloon or puff sleeve and a cold shoulder, crow neck or mock neck is so fun to jazz up a look!
I actually wear the above black sweater as a dress and a top! Totally versatile! I sized up one, to a medium. If you stayed true to size or sized down, you may not be able to get the dress version out of this.
The pink batwing is more of an exceptionally comfy top than it is sweater, but I had to include it because it’s that good! They have so many colors too, I may be stocking up! The last two are also so good, as you can see, I already own multiple colors! Great basics to go with any outfit!
You can also shop the posts below by scrolling and clicking on each image!
The last sweater I shared above, but hadn’t pictured is below. I sized up one in this and might even like another size up for a really baggy look. This sweater is a completely smooth, thick and high quality material.
Here is my top 10 list of favorite Express Denim, in order, regardless of venue, event or anything other than straight up comfort, style! For visual reference, I am 5’2 and a size 6 [28″ waist]. You can shop the post by clicking on the title of each one. Full disclosure, some of these styles have sold out, but I have tried enough to know, that the similar ones I’ve linked in replace of them, would still fit the profile of that style!
Returns are super easy too; you can send back in the mail or return to store!
These are great to wear casually or with heeled booties out to brunch. True to size.4. Modern Straight JeansThese jeans. I can’t say enough great things. They can easily transition from brunch to date night and I love the distressed hem.Â
These are on repeat in my wardrobe. I wear these to school and on a night out. The high waist and shape is so flattering and this is the regular length. They’re true to size and extremely comfortable, while holding it all in! One of the best features, is they don’t really fade with all the washing and drying!
These were my first pair of Express jeans and I was sold! These are true to size and regular length. The “mom” look provides structure with some room to breathe.Â
I have so many pair of colored denim from Express. Honestly, every time I see them pop up, I snag them because they’re so good for work. [I teach] and it’s a great way to stay comfy but jazz up an outfit and not be breaking any rules by wearing “jeans”.Â
They’re so versatile, super flexible and comfy. I am true to size in all of them, in the regular length as well.Ok, I left the best for last…THE PULL ON. You’d never know these jeans are elastic waist, pull ons. They are such a soft and flexible material and can be dressed up easily. I am a true medium.
With the exception of one pair of jeans that I kept from Wantable, I only have Express jeans in my closet. I have about 30 pair but figured I would try and narrow down my faves for now. I get true to size in pretty much all of them and the regular length. If you read the sizing details, Express is so clear about inseam length, which is super helpful. I took a measuring tape to mine and now know exactly when to order short or when to order the regular and cut them to the right length. I hope this helps guide you in the right direction if you’ve been wanting to take the leap into the world of Express Denim and feel free to comment with any questions you may have! The best is when they have sales for $40 denim etc because they’re high quality and worth the price!Thanks for reading!XOXO Kel
Follow me on your favorite app!
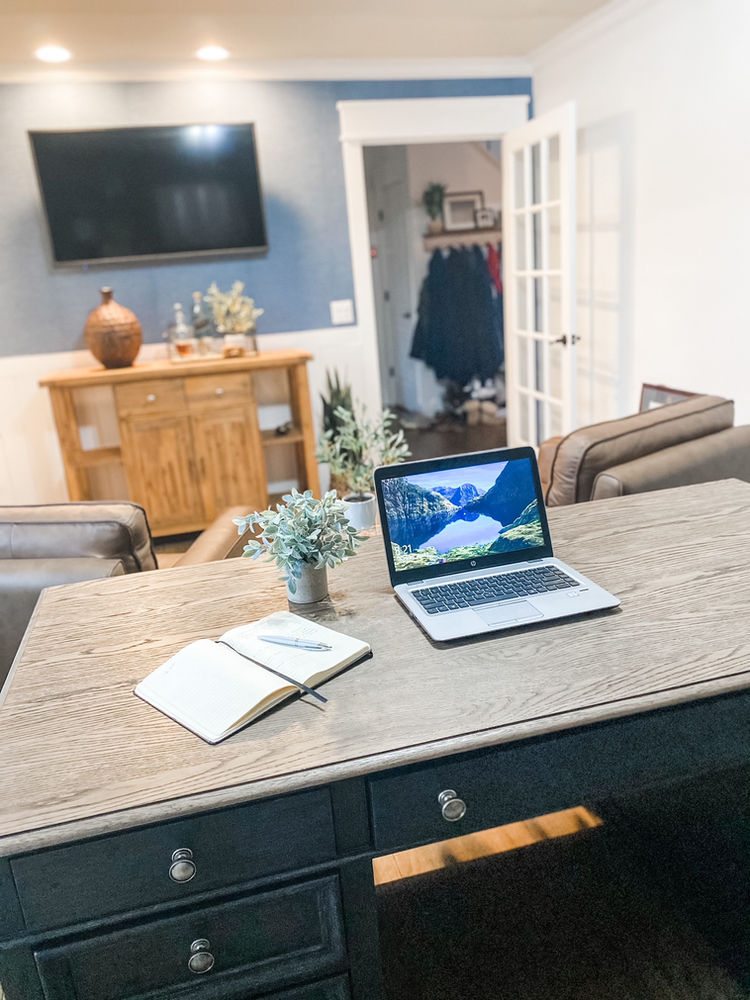
Have you ever had a vision of something that came so true to life, even you don’t believe it?! That was this Home Office for us! We came up with our concept, I drew it out on paper and after doing some research, we went to work! Keep reading to find out how we created this workspace and storage unit for only a couple hundred bucks and about 2 days worth of work!
The first thing we did was paint the room a fresh coat of white and then we settled on the color blue. We got 3 samples from The Home Depot and painted 12″ squares on the wall, so it was large enough to get a real idea of how it would look in the space. It’s a good idea to leave it up for 24 hours and check it out in the morning, afternoon and night, to truly make sure you like it in all of the lighting.
Once we picked our color, we got matte paint for the walls and a spot color chalk paint by Behr. They can color match anything, so we were able to get the wall paint and the chalk paint [for the cabinets] knowing it would be exact. The matte or satin finish helps it look more like the cabinets, as opposed to a typical eggshell, which has some sheen to it.
My drawing of our original vision…
We had to deviate from this a bit due to the vents up by the ceiling. Without moving them and affecting the HVAC system [we were not trying to make this that big of a project] we couldn’t do the bookshelves the way I wanted. We also ditched the drawers and slid the cabinets out to the side, making room for a center workspace. We figured we could swivel the chair around and that could be my blogging space at night, as I sit in bed writing this…
Cabinets:
After thinking about our needs for the cabinetry, we decided to go with typical base cabinets. We used two different widths, 18″ and 24″ cabinets. We wanted to fit our printer to be hidden in one and wanted to keep it symmetrical, so we got two of each.
One of the features of built ins, is well, being built in. This means that typically, the trim continues around the bottom of the cabinets from the adjacent walls. Once we found the cabinets we wanted, we had to elevate them off of the ground in order to create this continuous look.
Here are the frames…
You’ll have to measure out all of your factors, height of cabinet’s kickplate, height of your trim [ours was 5″ and the kickplate was 3.5″, which is average]. Rob went and got wood from Home Depot and nailed it together in a simple rectangle, the size of the cabinet base. We laid the wood down so that we had our approximate 1.5″ we needed to raise the cabinets. Once we laid them down, we positioned the cabinets on top and secured them to the base and the wall, using a screw gun. We placed the trim across the bottom of the cabinets, mitre cutting it to fit in the corners, then painted it!
We finished off all of our base trim with shoe trim or quarter round.
You can see in the middle and right photos, that we have metal brackets on the cabinet sides. These will hold the counter top for my workspace.
Countertops:
All of the wood accents in our house are pine with the same stain, Minwax Special Walnut. We spent a lot of time getting this to match the flooring, which is a totally different wood/stain combo. We ran into an issue, where we couldn’t find planks of pine deep enough to cover the space with an overhang. Rob actually had the idea to get stair treads, with the rounded front edge and use those. He had to get another plank of pine to trim and glue to the tread, to get the depth right. Once sanded and stained, you can’t even see the seam. We put it in the back and have our decor over it. We glued to counters to the top of the cabinets.
Below are the counters, prestained.
The Hardware:
I actually swapped out the hardware from my original idea. The knobs above were the first one we went with and once installed, I thought it looked cheap, so we went with old faithful and got the bras handle bar pulls, which is what we have in the kitchen and living room, but in bronze. [Linked here]. They’re great quality and we haven’t have any issues.
The shelves:
The shelving is actually a custom DIY also. We got the piping from amazon [linked here] and used pine planks that we stained, for the shelving. They’re 12″ deep by 1″ thick. They add a really nice masculine touch to the room while keeping it open and airy.
I hope you enjoyed reading how we did these and that you found some inspiration! As always, thank for reading!
So, a funny thing happened today. @liketoknowit.home posted a pic of my dining room. This, in and of itself, is amazing and I’m still pinching myself to make sure it is real life. Quickly, this one account has 1 million followers and aside from that, one of the big bloggers I have been following since I started, commented on the post! My life has been made and all of my hard work has completely paid off. I can now retire! [JK, now more than ever, I feel like I’m just getting started!]
The irony in this situation, is that for the past 6.5 months, this room has been our catch all, junk room. My mother in law asked my husband how long we were going to let it sit like that! It really was bad, and if you read my post about it a few weeks back, you saw what it was! Just the other day, we finally pulled the trigger and got our chairs and table ordered and luckily delivered. I cleaned out most of the boxes, threw a bunch of stuff out, hung a painting and the sconces and got halfway through refinishing the fireplace before running out of materials. [Everything comes Tuesday to finish, so keep checking in for that transformation!] We have big plans for the built-ins in this room and have been talking to cabinet makers, but until then, what you see is what you get, inclusive of the football under the chair #boymom and a glimpse of the remaining junk in the corner!
I can’t wait for everyone to see this room when our entire vision comes to life, but in the meantime, a half done, strategically taken photo [taken with my phone] will have to do! Sidebar, we are absolutely in love with the new dining furniture! It goes together so well and while everything was exceptionally hard to find and sold out most everywhere, our persistence paid off and the end result is perfect! The chairs are such good quality; our friend who only buys @restorationhardware furniture, touched them and asked if they were from RH! Who knew, @amazonhome would nail it! Our table is from Macy’s, you’ll just have to wait until October to get it! It has the leaf in it and seats 10 comfortably but can fit 12! We may search for 2 arm chairs and move the existing ends to the sides…I think we’re going to get the matching credenza too…
I’ve linked the furniture and other items in the pic, in the small thumbnail images below the photo. Scroll through, using the left and right arrows and click on what you’d like to see!
As we were in the design stages of our home renovation, we made the decision to turn our once formal dining room into a home office. This decision was made solely on the “well, it’s not going to be the playroom” discussion. [Since it’s the first room you see when you walk in.] We finished phase 1 of our renovation as the covid shutdown hit and had no idea how this decision would ultimately benefit our household! As we had so many other finishing touch projects going on in the main part of the house, my poor husband sat in what he called his storage room for almost a year, as the “office” seemed to become a dumping ground for all the things! So, you can imagine our excitement when Raymour & Flanigan mentioned partnering with me to finally complete this space!
Here is what it looked like before and during the process…
The Vision
Since this was a formal dining room, it was a nice size, and while our home is on the larger end, square footage wise, we actually don’t have any spare space! So, my thought was to create a home office/tasteful man cave, so my husband would have a space for himself to truly enjoy. When I think of my husband, I think cognac, leather and bourbon. He tends to be a traditional guy and I’m more modern/rustic, so to fully design a space that tied both together seamlessly and provided that wow factor when you walk in, was definitely not easy! In fact, we had many a debate on the desk, because I wanted a simple console desk that would keep the space open and airy and he wanted the bigger executive desk. Ultimately, he won because he is legitimately working in there for 8+ hours a day and he needed to be comfortable. It also helped that I found the gorgeous Verona Executive Desk from Raymour & Flanigan that included dark board and batten and driftwood tones.
Below are the mood boards I created…
Mood boards are a great way to get a feel for the direction you’re going in because you can see it all laid out right away. I was worried this sideboard wouldn’t go well but once I plugged it into the mood board, I saw that it complimented the brass table and brass hardware from the built ins, keeping cohesiveness throughout the space.
We started designing the room around DIY built ins that we worked on together. I call them our labor of love! We picked a moody blue for the wall and cabinets and didn’t think twice about the gold/brass hardware. This played heavily into the design of my mood board while searching for the perfect pieces at Raymour. I think the leather Bryce Chairs were the first thing we picked out. It was love at first sight and sit! We then argued about the desk for a while until we found the Verona Executive Desk and then we moved onto the Amelie area rug. This beauty is, I think, the showstopper, which is hard to say out loud because each piece is more beautiful than the last! It is bolder than my normal go to neutrals but the warmth of the burnt orange ties in with the cognac and wood accents perfectly and the shades of blue obviously compliment the accent walls. The Cold Spring Sideboard was an easy sell because when I saw it, I had to have it. Period. The lighter, natural wood tone pulls out the brass from the built ins’ hardware and the simplistic and stunning Hera Round Side Table. We knew we were mounting the tv and I didn’t want this black structure against a white wall, so we pulled together a quick accent wall with leftover tongue and groove from our family room ceiling and wallpapered with a navy blue seagrass. This color combo truly makes the warm/rustic sideboard stand out as the focal point of this wall because now, you hardly notice the tv.
We still need to get some shades, custom artwork for the walls and we already swapped out the painting for a round, brass mirror in between the built in shelving.
The Details
Area rugs truly make a space. They can bring warmth and dimension and ultimately tie all of the elements in the room together. Here, I chose a 7×9, leaving a foot on each side. I went smaller because I didn’t want to totally hide our brand new floors that I spent so much time perfecting [stain combo wise] and I also wanted to define this “man cave” space, keeping it separate from the “office”.
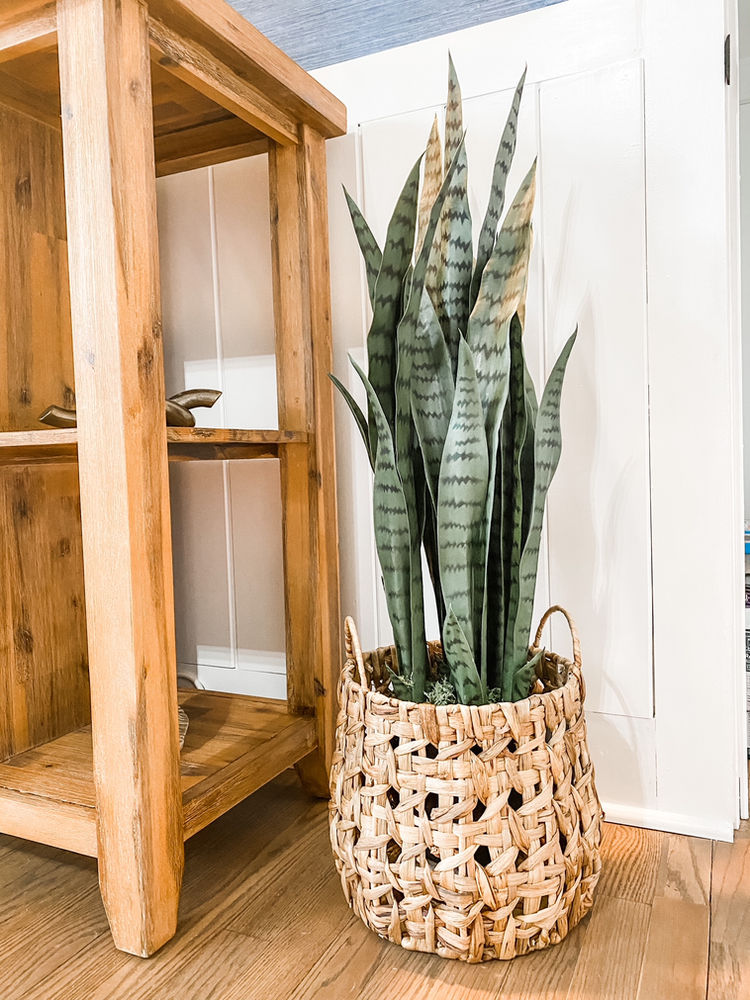
Not only does Raymour & Flanigan offer beautiful furniture, but they also have amazing decor, like the faux plants I have in the office! Greenery really adds texture and contrast to a room but I am terrible at keeping plants alive, so I go all in on the faux! This gorgeous snake plant draws your eye up from the floor to the sideboard. It came in a pretty black planter, but I placed it inside this basket to build up a little more depth and add even more texture to the space.
I also placed a variety of other smaller plants around the room, like this silk olive plant on the side table. I placed the other Olive Plant in the bourbon tray, on the sideboard. It adds depth and texture to the otherwise simple, sleek design.
It was such a pleasant experience working withRaymour & Flanigan and I really love that they offer style and budget options for everyone! Plus, they have free shipping (on select items), and they have showrooms scattered around the Northeast.
As always, feel free to comment with any questions you may have! We had so much fun designing this space and couldn’t be happier with the end result!
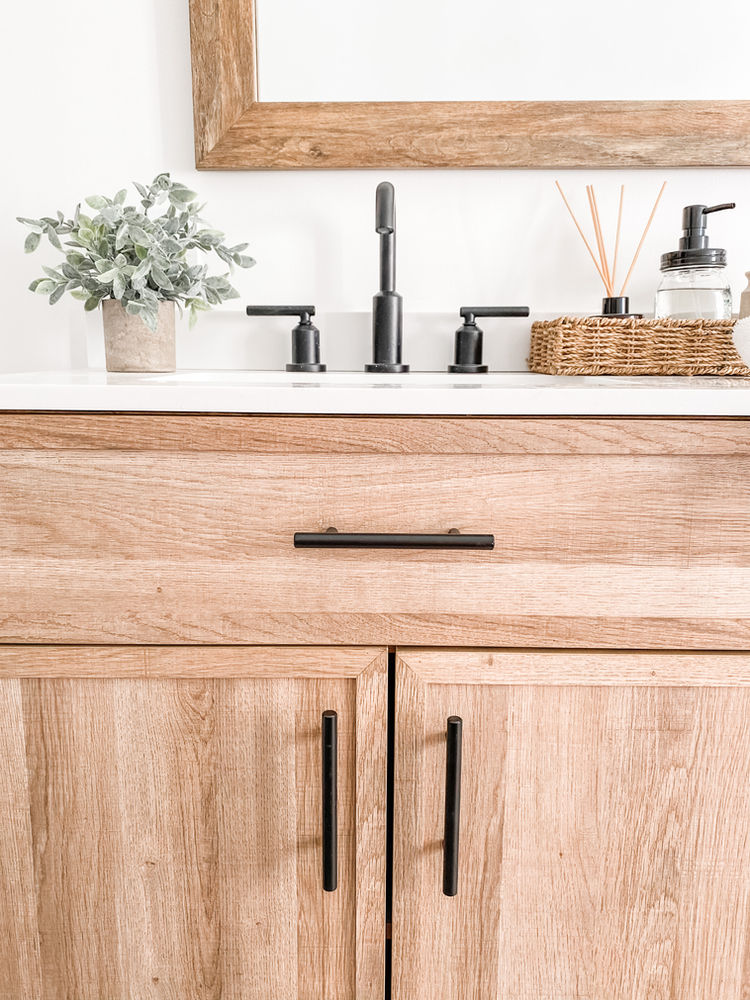
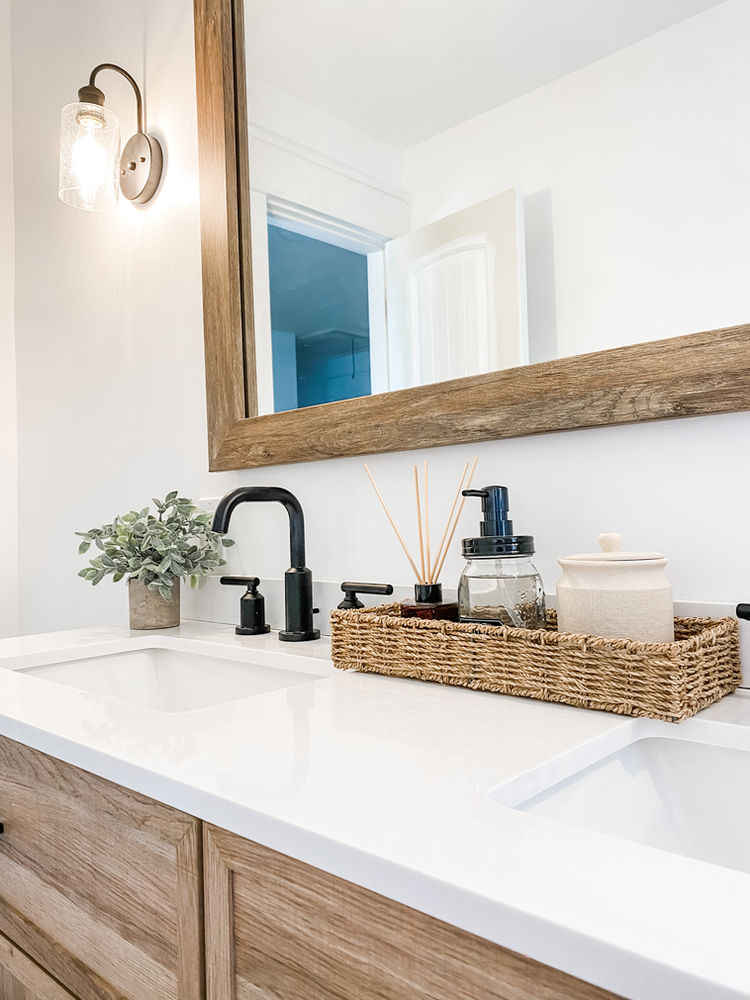
[All details linked here] This bathroom was so fun to design and to be honest, didn’t really play out much differently than we expected, which can’t be said for a lot of gut renovations! We actually started designing this space, including having purchased the flooring and subway tile, 3 years ago when we first moved in! We decided to wait, with the expectation that we were doing an upstairs renovation and would be ripping it out to move it, but in the end, we decided to wait on that and pulled the trigger on this main bath beauty!
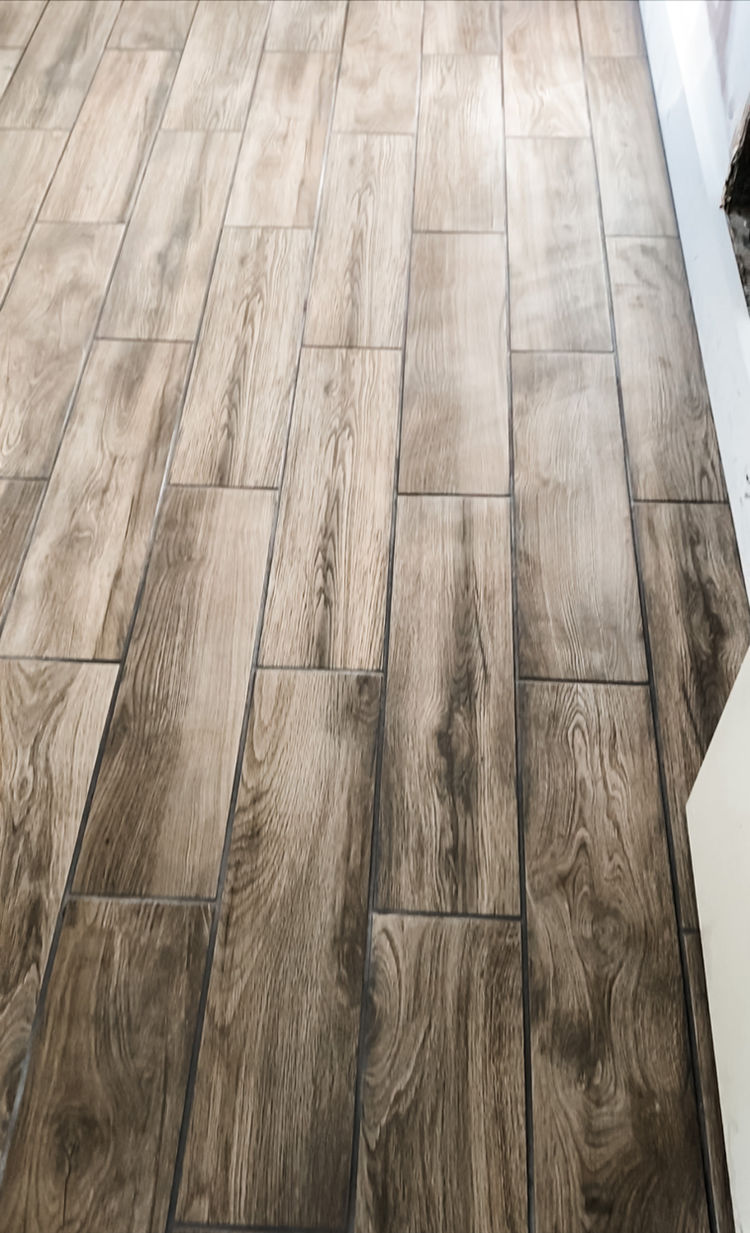
Since we purchased the flooring so long ago, the color has actually been discontinued. It is ceramic tile that looks like wood planks. It’s by Lifeproof, is anti slip and waterproof, perfect for 3 young boys in the bath! Here is the same color but in a gorgeous hexagon pattern! These sheets are great to work with, especially for DIYers. I did both our powder room and master bathroom using sheets, entirely by myself, never having tiled before that! Here is the plank version like we have, but in a different [yet very similar] color. This tile is exceptionally affordable as well. Our whole bathroom floor cost about $60.
I’ve linked this amazing rug. This has been one of my most popular links to date! It says spot clean, but I’ve thrown it in the washing machine on delicate cycle and then put it right back here to air dry and it came out good as new! [But, I love to push boundaries]
Turn your troubles into bubbles sign is linkedhere.
There are not enough good things I can say about this vanity. We found it at Lowes and it is perfect! It has since sold out but I found it elsewhere and linked it for you here. The quality is superb and as you can see, it’s gorgeous. We got the double vanity but there is a single. The top is solid white quartz and this baby is heavy! A bonus is that it comes with two sets of hardware; matte black and chrome! We chose to install the black so it would match our Moen faucets. They’re linked here. I’ve also linked the shower and tub faucet. It also comes with 1 or 2 [depending on the vanity] mirrors that match. We chose to keep our current flat, frameless mirror and utilize a company called mirrormate to upcycle it!
Ignore the half painted door in the mirror…but this frame is so beautiful, matches perfectly, was so easy to install and is so affordable! I was really torn between black and wood toned but they took the guessing out for me because you can get free samples and see first hand, what the outcome will look like! In the end, it was unanimous for the Cherokee Barnwood finish. Use code EMMAGRACE15 for a discount at mirrormate.com
See how we assembled and installed the frame by clicking the video below!