DIY Whitewashed Fireplace Makeover
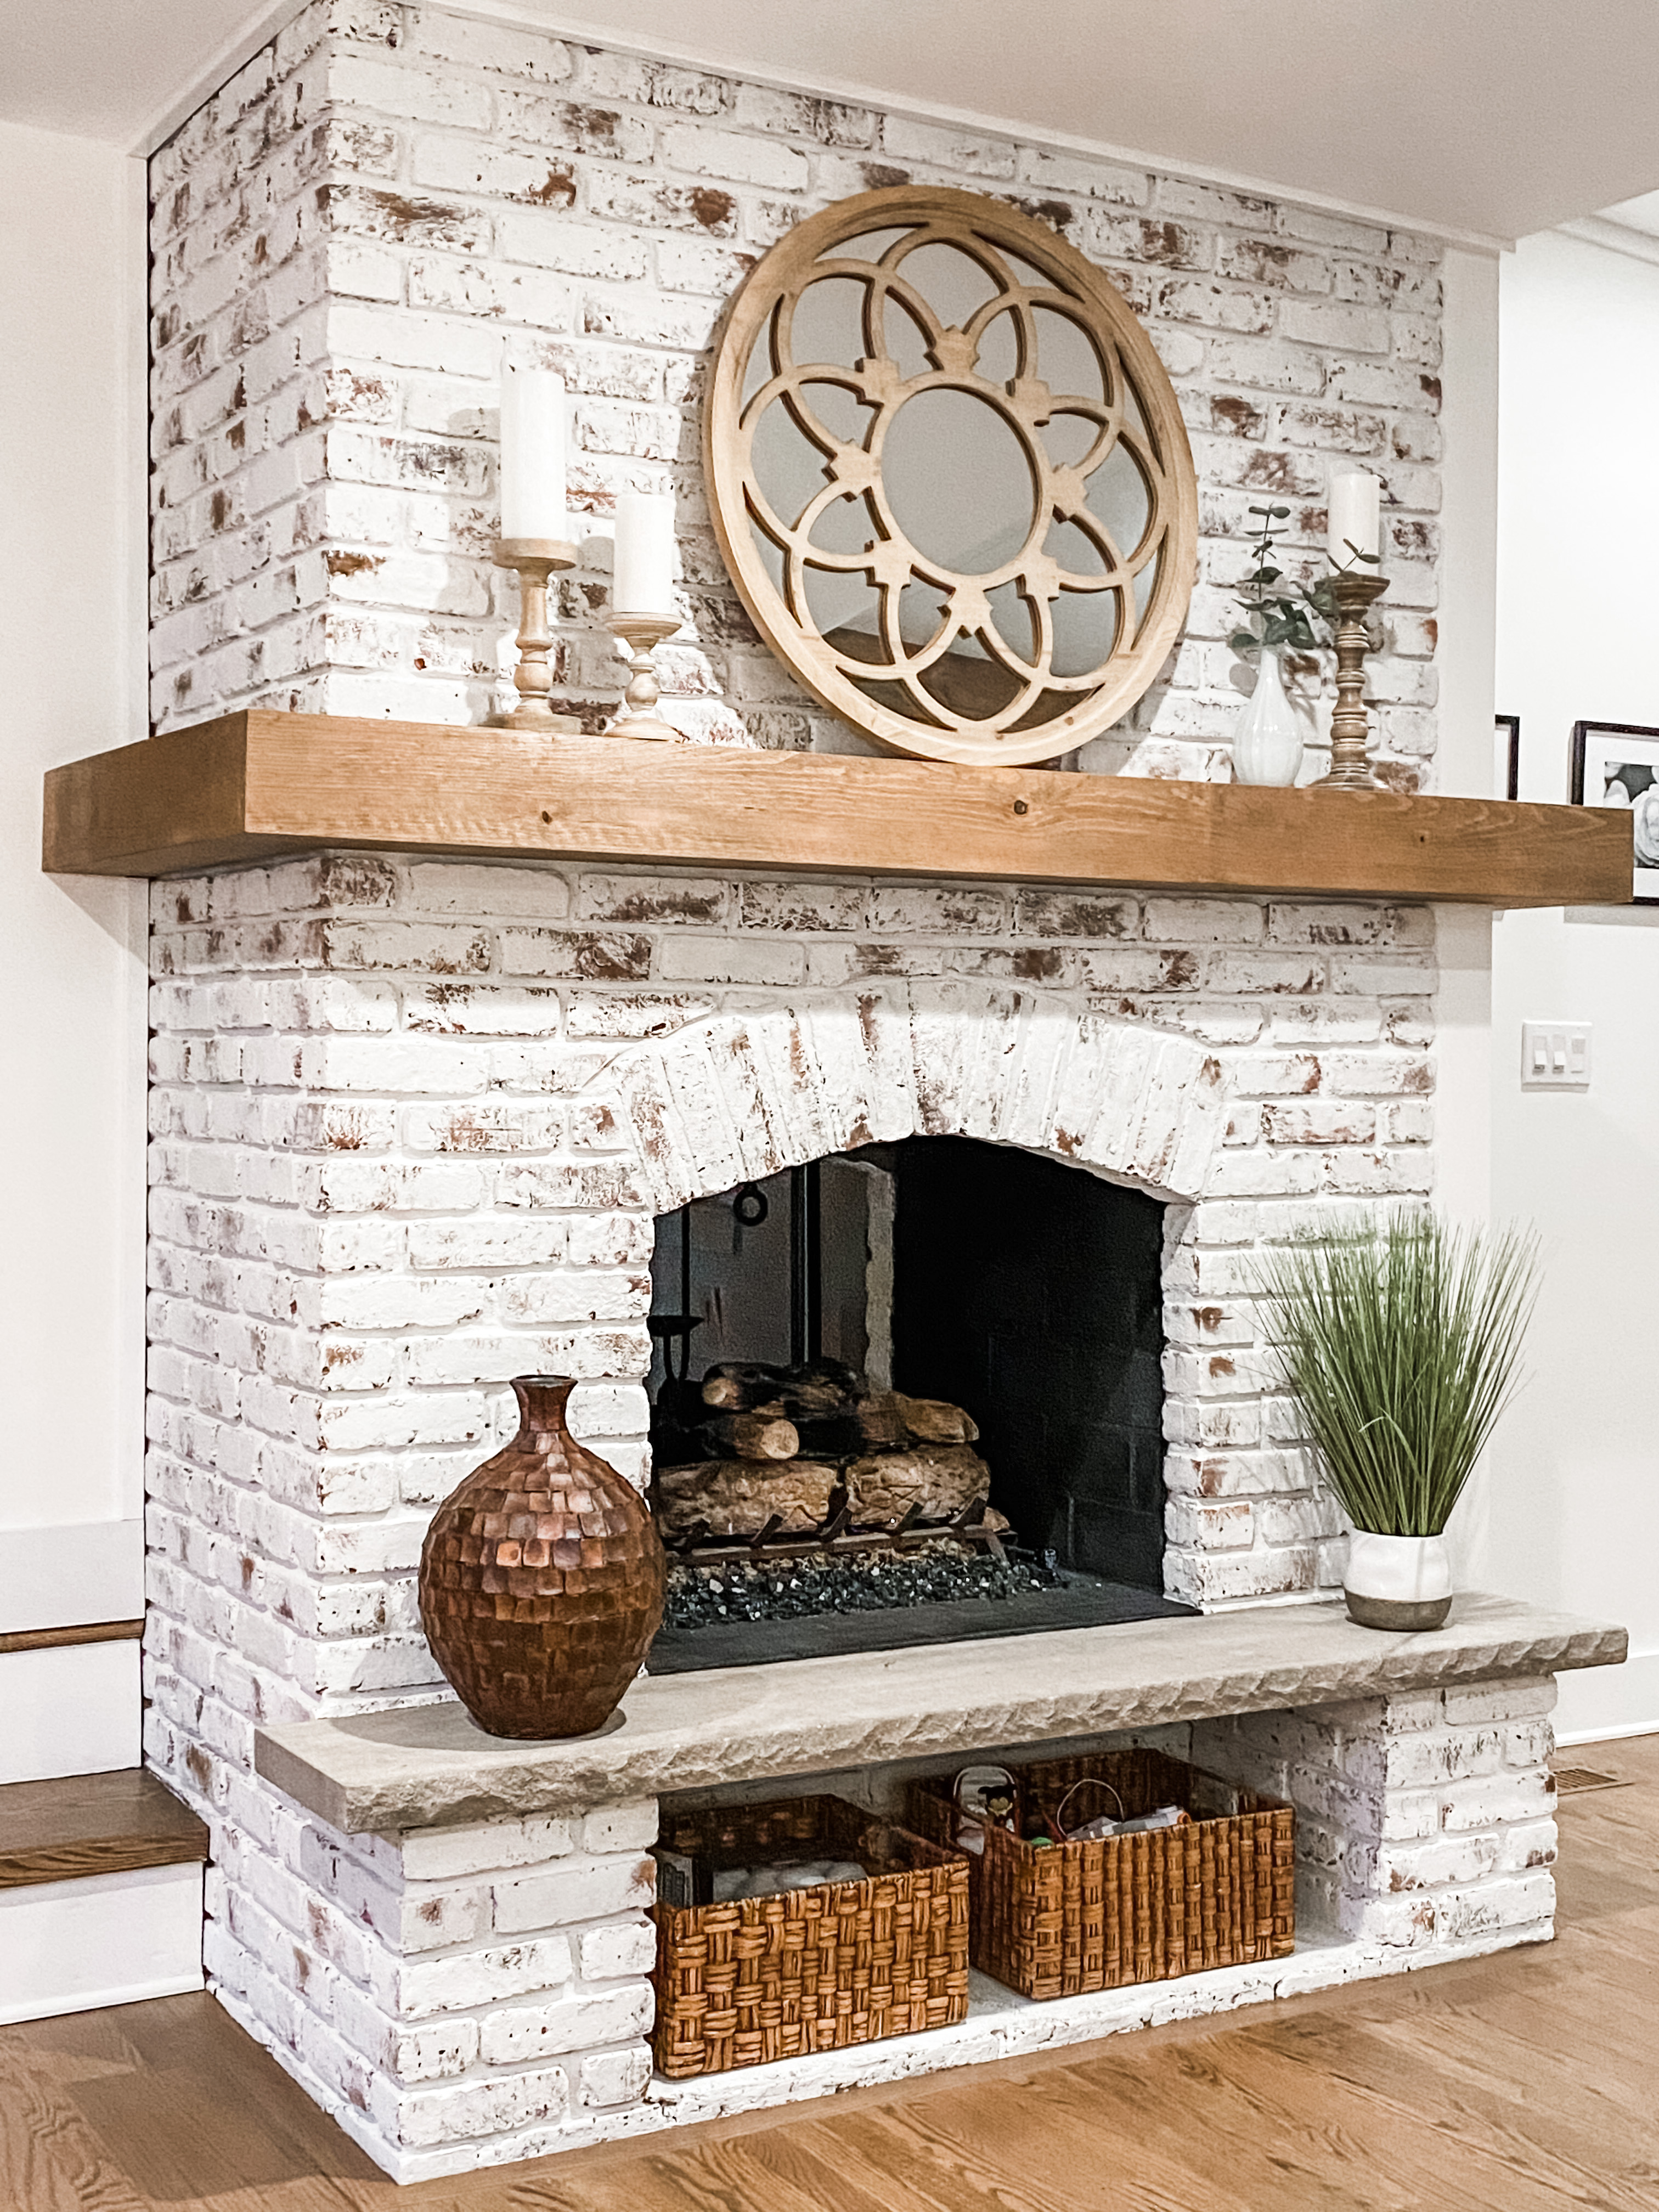
 One of my most asked questions is who I hired to transform my fireplace and what is cost. I laugh as I say, I did it and about $20! Our fireplace is the main feature of our home. It is a dual sided, looking through from our dining room to our sitting room in the center of the house. Regardless of the color, I think exposed brick is such a unique and fabulous characteristic to have but our renovations just called for something lighter than red! Keep reading to see how I took this from rustic to farmhouse chic in under $20 and about an hour of my time! [For the outside] Details on the entire makeover are below.
I had to do a little prep work because the tv and some other things use to be hung on the brick and there were large holes from the bolts. I used Ready-Mixed Concrete Patch and my finger, to fill in the holes. It dries gray but that didn’t matter for me, since I was painting over it anyway.


I actually whitewashed the one side prior to doing this, using watered down latex paint. See below photo. I didn’t love the result. The brick absorbed the paint and everything was tinted various shades of gray.

Once the concrete patch was dry, I grabbed a can of Rustoleum Chalked, in color Linen White and got to work! I eyed up the areas that I left red, so it would have the German Smear appearance. The most important part of this look is to paint the mortar white as well. The concept behind the German Smear is that it’s suppose to look like plaster is covering the entire surface with some areas having “aged” off. It’s so easy to do, I even let my kids help. It’s really hard to mess it up!
https://video.wixstatic.com/video/782185_35bc65c359db43b1b8fb6800cefdd30d/1080p/mp4/file.mp4
The chalk paint dries almost instantly and anywhere you applied too much, you can wire brush off, revealing more of the underneath. I didn’t seal it and I have yet to see one scratch. I even painted the floor level hearth with it on the dining room and it’s still perfect. Even if it did scratch, the technique lends itself to aging and distressing, so it wouldn’t matter!

My actual technique is to swirl and scumble [dot vigorously] with the brush. I tried to avoid creating linear strokes of any kind and just kept moving the brush. Pay special attention to the areas you’re leaving blank and do extra scumbling there, to soften edges so that they appear distressed. No hard edges! You can obviously paint the mortar with strokes, but then scumble or swirl over the hard lines on the actual brick, if some gets on there.
The inside was completely redone too. It was the natural beige firebrick and had the black marks from the fire on the walls. I removed the logs and cleaned them off [putting them back exactly where they were is so important for the gas distribution and air flow, so take a photo first] Other than wiping down the walls to clear off any debris or cobwebs, I didn’t clean them.

I took high heat resistant paint and redid the interior black. I love the pop of contrast this added to the white and it will also hide all of the soot marks! Then, I laid down new sand [which helps the gas distribute properly] and Rock Wool, for the effect of real embers burning.

Lastly and my favorite finishing touch, I added glass! I used two types, larger black and small bronze. It adds slight dimension and the reflection of the fire flickering is just beautiful. It also adds a touch of glam to the space, since it’s all open and finishes it off with a polished look.

Below is a photo from last Christmas…excited to decorate it this year!


I linked a mixture of Home Depot and Amazon throughout the post, but the Amazon links are all below if you prefer that method!
Amazon Links
As always, thanks for reading! Comment with any questions!
XOXO
Kel
Follow me on your favorite app!


Hello, I love this !!! I plan to do this to my fireplace soon. Question, did you Wipe after you painted the entire fireplace? I didn’t see it done in the video.
Hi! Thank you so much! I did not! I just brushed it in as you saw and that was it! You could always take a wire brush to any areas where you did too much and remove it that way, if you use the chalk paint. When I did the latex first, it didn’t come off, even with paint thinner and a wire brush. So, I’d definitely recommend the chalk paint!
I absolutely LOVE this! It’s gorgeous!! 2 questions; did your use a wire brush on yours, and what kind of paint brush did you use?
Hi Melissa! Thanks so much for being here! I did not! I used chalk paint and a regular flat paint brush. I scumbled around, which means to brush in circles as you’re tapping up and down. You can buy a cheap brush too. Doesn’t have to be anything fancy.
I brushed the paint on the grout first and then scumbled on the straight edges on the bricks to break it up. The best part is, chalk paint is so easy to scratch off that if you do too much, you can easily remove it with a wire brush or sand paper. But after 4 years, ours hasn’t budged! Let me know if you have any other questions!
Thank you so much for responding! I’m a nervous wreck! Lol I ordered the paint from your link. It will be here on Wednesday. After work I’ll be coming home to paint! I watched your video at least 10 times. Say a prayer for me that mine turns out as beautifully as yours!! â˜ºï¸ I’m so grateful for your easy instructions and tips! THANK YOU!!
Omg thank you so much! I’m so glad you love it! It really was so easy. As I said, the nice thing about this chalk paint, is if you don’t like it, it’s easily scratched/wire brushed off. I messed up on the first side and used water down latex paint and there is NO getting that off! You’ve got this!! Let me know if you run into any questions or issues along the way! Happy to help!!
Your fireplace came out so good! I want to do something similar to the fireplace in my house. Thanks for the inspiration 🙂
Thank you so much! That means the world!! It’s so simple, you can def do it! HIGHLY recommend the chalk paint vs mortar etc. it’s easier to work with, more forgiving and not messy!!
Want to do this. I was wondering how much paint did it take for both sides?
Hi!! I didn’t even use 2 cans!
Just completed my whitewash
Did you put a seal on it?
Thank you
I did not! And it hasn’t so much as a scratch!
Did you water the chalk paint down?
Nope! Right out of the can!
I did not!!! Straight out of the can!